| Anchorage is a thoroughly modern city with thoroughly modern (meaning restrictive) laws. Unfortunately, those laws essentially prohibit backyard
boat builders from erecting the temporary shelters they need to protect their projects from the wind, rain, and snow. Isn't this place called the
last frontier? Well, at least I can still see Alaska from here.
Seriously, the largest structure I am allowed to build is one with but 120 square feet of floor space, and even then it can only be used for tool storage,
or as a child's playhouse. I would need a permit for a larger structure, and have to pay $500 for the privilege to use it for six months. If I needed more time, I
could buy an extension for another $500. And all I want to do is build an oversized rowboat! Sorry Mr. Michalak, I meant to say a light, rough water power skiff.
I noticed as I was reading the municipal regulations that I should be able to build a canopy to protect my boat as long as it does not exceed 700 square
feet, is open on all sides, and is at least 15 feet away from all other structures. This type of structure can't be heated, but it will keep the snow and
rain off of me and my wood.
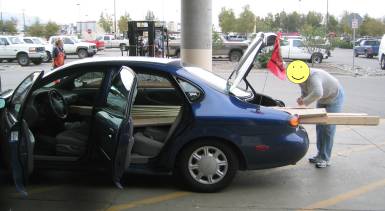 My girlfriend and I made a trip to a local big-box store to pick up some eight, ten, and twelve foot lengths of 2 x 4's to make a canopy of my own
design. Like boats and web sites, I don't know anything about canopies, either. That's a picture of her securing the lumber in the back of our car.
Yes, the smiley face is there intentionally. The thought is to protect the innocent from the unscrupulous; she is the love of my life, ya know.
My girlfriend and I made a trip to a local big-box store to pick up some eight, ten, and twelve foot lengths of 2 x 4's to make a canopy of my own
design. Like boats and web sites, I don't know anything about canopies, either. That's a picture of her securing the lumber in the back of our car.
Yes, the smiley face is there intentionally. The thought is to protect the innocent from the unscrupulous; she is the love of my life, ya know.
The boat is supposed to measure 18 feet long by 5½ feet wide. The canopy will measure 24 feet by 12 feet. This should allow me to have ample
overhead coverage while I work on any section of the boat. The height of the canopy will be 8 feet, and it will be more or less flat. Why would I
have a flat roof in snow country? First, I need to lessen the impact that this contraption would have on my neighbors. Second, an effective peaked
roof would have to be about 16 feet or higher to shed the snow load, and this is just too high. At a height less than this the snow would just sit
on the roof and have to be removed by hand. Might as well just make it flat.
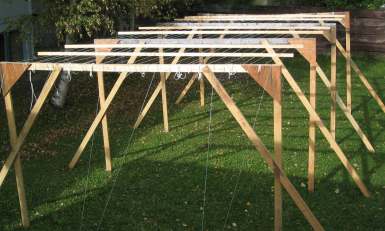
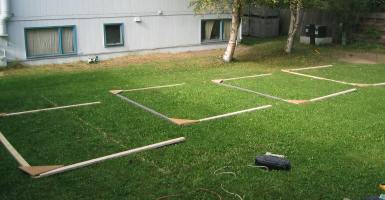 I laid the 2 x 4's out in my back yard. The 8-foot lengths are the uprights, and the 12-foot lengths are the headers. I will use the 10-foot lengths for
diagonal bracing. The four frames are spaced 8 feet apart. I am about to attach the plywood gusset on the frame to the bottom left corner. These were made
from a half sheet of 3/4 inch plywood that I found. You can see a line of gold spray paint on the lawn crossing under the first frame. I outlined that part
of the yard that was 15-feet from every structure.
I laid the 2 x 4's out in my back yard. The 8-foot lengths are the uprights, and the 12-foot lengths are the headers. I will use the 10-foot lengths for
diagonal bracing. The four frames are spaced 8 feet apart. I am about to attach the plywood gusset on the frame to the bottom left corner. These were made
from a half sheet of 3/4 inch plywood that I found. You can see a line of gold spray paint on the lawn crossing under the first frame. I outlined that part
of the yard that was 15-feet from every structure.
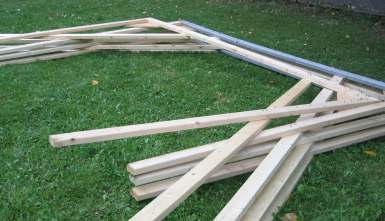 I attached the 10-foot diagonals to complete the frames. I used screws to connect everything together.
Hint:
- Pre drill screw holes to avoid snapping off screws while driving them
- Use the right length screws for attaching things. Those black dots on the 2 by 4's are screw shanks that I had to cut off with a grinding wheel-
took two hours extra time
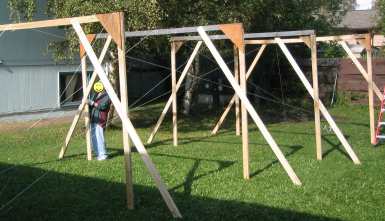 I drove three aircraft style ground anchors in a line into the ground about six feet outside each end frame. The idea was to build a
"suspension canopy" using 3/16th inch aircraft cable across the tops of the frames and attached at each end to
the ground anchors. I finally figured out that I could stand all frames up simultaneously by looping rope singly around each frame to
a ground anchor, and then put up the aircraft cable. There will be two cable ends to each ground anchor.
I drove three aircraft style ground anchors in a line into the ground about six feet outside each end frame. The idea was to build a
"suspension canopy" using 3/16th inch aircraft cable across the tops of the frames and attached at each end to
the ground anchors. I finally figured out that I could stand all frames up simultaneously by looping rope singly around each frame to
a ground anchor, and then put up the aircraft cable. There will be two cable ends to each ground anchor.
 The six main support cables are in place and attached to the ground anchors. Initially I tensioned them just by hand and secured them with wire
rope clips. This proved to be inadequate (too loose) as the success of the structure depends on the wires being very taut.
The six main support cables are in place and attached to the ground anchors. Initially I tensioned them just by hand and secured them with wire
rope clips. This proved to be inadequate (too loose) as the success of the structure depends on the wires being very taut.
I remembered that my brother-in-law had given me a come-along about ten years ago. I couldn't think of any reason why I would use such a device,
but I held on to it all these years anyway. I decided to try it by attaching one end to an outside support header and the other end to a cable
threaded through a ground anchor--it worked perfectly! Thanks Richard! Another note: each end of the support cable goes through a ground anchor and
loops back upon itself about three or four feet. I used three wire rope clips to secure each end of each cable to prevent slippage. There is an old
saying, "Don't saddle a dead horse," meaning that the u-bolt part of the wire rope clip is to get tightened against the free-end of the cable
when you bolt it up. You'll figure it out if you ever use one of these clips.
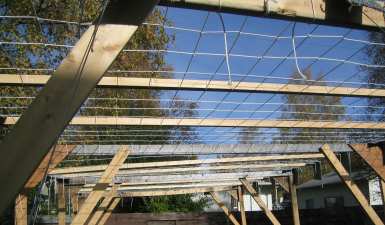 The canopy frame will be covered with a tarp and will be supported by a rope lattice in addition to the six main tensioned cables running across the top.
There are four longitudinal nylon ropes between each cable, and six ropes threaded horizontally between each frame. Between each frame are two equally
spaced 2 by 12's resting on top of and attached to the support cables. Everything is either looped around or fastened to something else. If you like
gardening, then you will probably find threading the rope...therapeutic.
The canopy frame will be covered with a tarp and will be supported by a rope lattice in addition to the six main tensioned cables running across the top.
There are four longitudinal nylon ropes between each cable, and six ropes threaded horizontally between each frame. Between each frame are two equally
spaced 2 by 12's resting on top of and attached to the support cables. Everything is either looped around or fastened to something else. If you like
gardening, then you will probably find threading the rope...therapeutic.
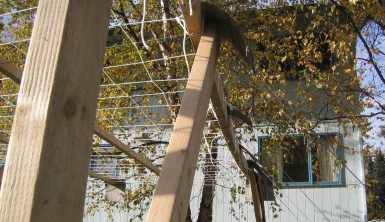 This is the west end header. It has taken a pronounced inward bend due to all of the cable tension loaded upon it. I probably should have
built each end header with double 2 by 4's now seeing the strain. If it breaks, the whole thing comes down. The other end looks great. Maybe
this is just a flexible 2 by 4? I found a carpet that was about to be thrown out, and decided to cut it up into one-foot squares. I attached
the squares at each potential chafe point on the structure to protect the tarp.
This is the west end header. It has taken a pronounced inward bend due to all of the cable tension loaded upon it. I probably should have
built each end header with double 2 by 4's now seeing the strain. If it breaks, the whole thing comes down. The other end looks great. Maybe
this is just a flexible 2 by 4? I found a carpet that was about to be thrown out, and decided to cut it up into one-foot squares. I attached
the squares at each potential chafe point on the structure to protect the tarp.
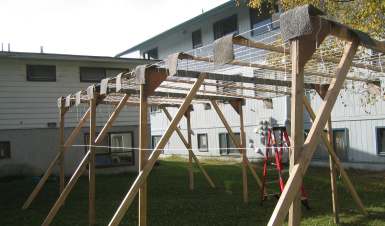
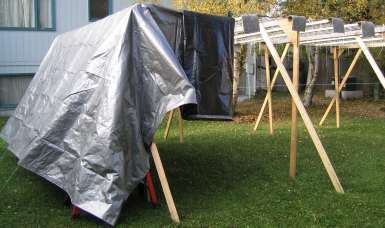
The framework is completed, just awaiting the tarp. Note the carpet tacked on all of the chafe points down the sides as well.
The legs to the frame sections on the far side have been sunk into the ground about four inches to create a natural slope to that side. This
will allow rainwater to drain off to that side.

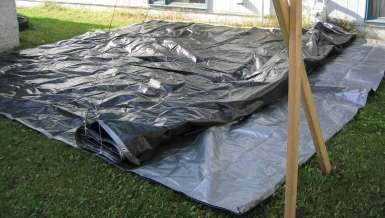
This is a big tarp! It is a heavy duty 30 feet by 40 feet "Sunshield" tarp. It is opened only halfway, both lengthwise and widthwise.
My happy helper had some business elsewhere to attend to, so I was on my own to get this up before I had to get to work that evening.
I got it up, and began to roll it out. I had to roll out one side and then the other, moving the ladder each time.

Here, you can see the lattice network holding everything up. With the black side down, it is a little dark under there. Nothing a 500 watt
light can't fix.
 COMPLETED
CANOPY!
But will it work with a snow load?
|
